Edge 7.2 Release Notes
Published on
Welcome to your Edge Cloud 7.2 enhancements!
- Edge Proposal
- Canadian ACH Transaction Support
- Gender Identity Support
- Online Form Links Can Specify Doctor, Office and Other Metadata
- Online Forms Can be Filtered by Doctor, Office and Other Metadata
- Online Scheduling Form Required Cell Phone Option
- Online Scheduling Honors Procedure Start and End Times
- Patient Sign In Confirmation Uses Nickname
- Security Added to System Integration Editor
- Treatment Chart Required Fields Option
- Treatment Chart / Plan List Report
- Treatment Chart Styles List
Edge Proposal
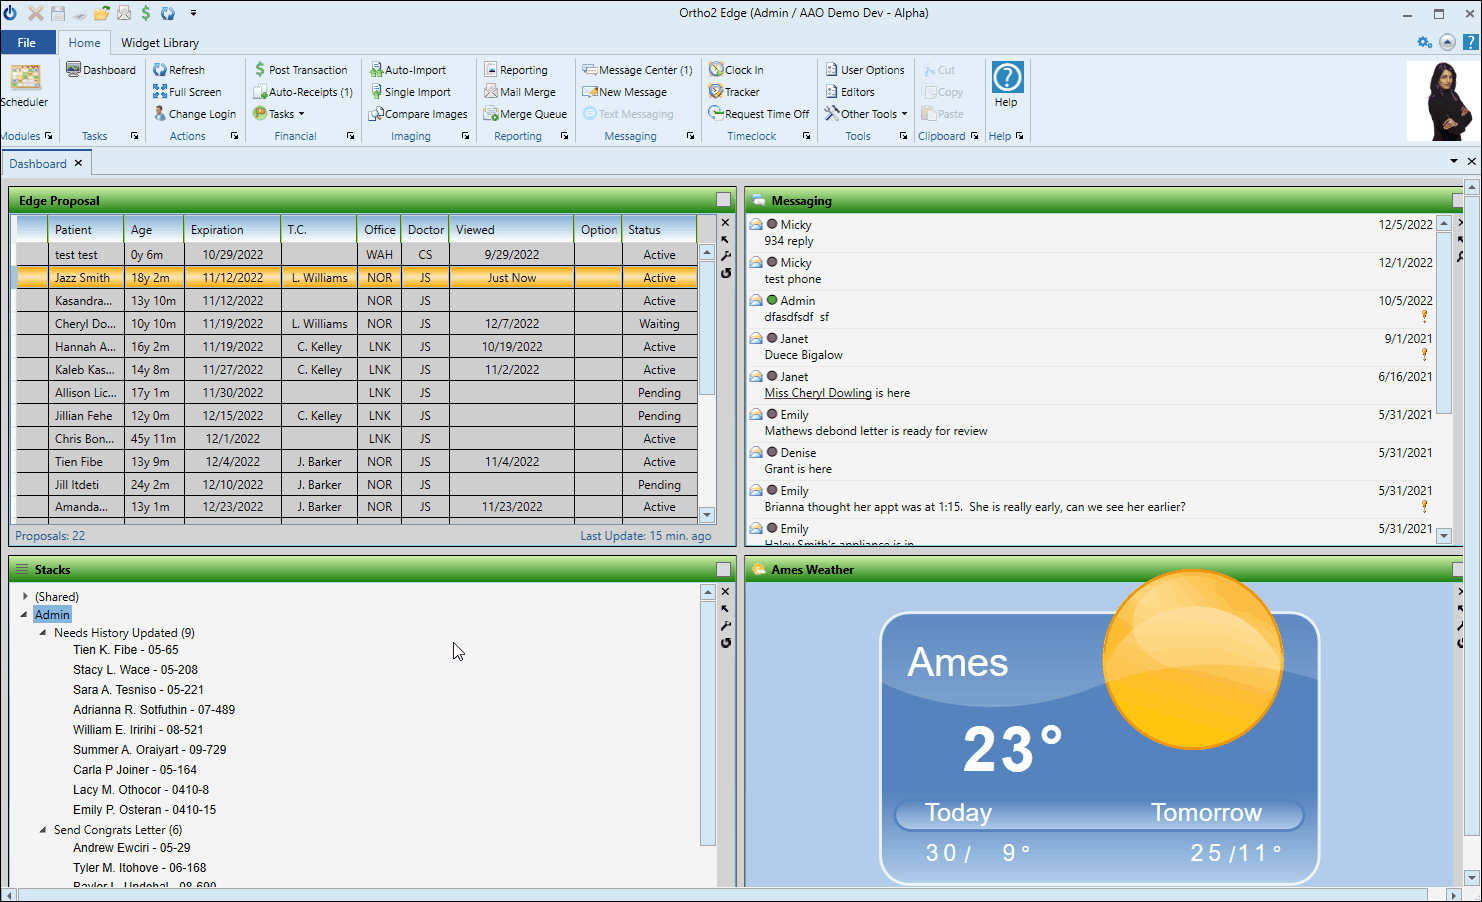
With this release, all Edge Cloud users can use Edge Proposal to create orthodontic contract proposals which allow your responsible parties to select the terms of their contract with easy-to-use interactive sliders. You set the treatment fee, define the parameters your office is comfortable with, and offer a list of treatment add-ons. The responsible parties do the rest in the Edge Proposal companion app.
- Enable Edge Proposal - When you upgrade to Edge Cloud 7.2, you have the option to use either the original Legacy proposal system, or Edge Proposal, or both. Your system will default to either Edge Proposal or All (meaning that both proposal systems are enabled), depending on your recent proposal activity. You can choose which proposal system you wish to use at any time in your System Financial Settings editor. Regardless of that setting, any existing proposals will continue to use the proposal system you used to create it.
Create and Manage Proposals
After you set up your Edge Proposal Add-Ons and Templates editors, you create Edge Proposal orthodontic contract proposals from the Finance page of the Edge Cloud patient folder. Each proposal can include multiple treatment and template combinations to provide your patient families with a variety of treatment options.
Tell me about creating proposals…
Tell me about managing proposals…
The Edge Proposal App
Once you activate a proposal, you can share it with the responsible party via email, text, QR code, or a direct link. The responsible party uses the link to open the Edge Proposal app where they select treatment options, fine-tune their payment plan, and accept the treatment terms.
The Edge Proposal Widget
Use the Edge Proposal widget to review and manage your patient contract proposals. The widget lists the proposal expiration date, whether the responsible party has viewed the proposal with the Edge Proposal app, and the status. You can filter the widget results to view only the proposals relevant to you. In addition, you can open the patient folder to the proposal page and share the proposal with responsible parties directly from the widget.
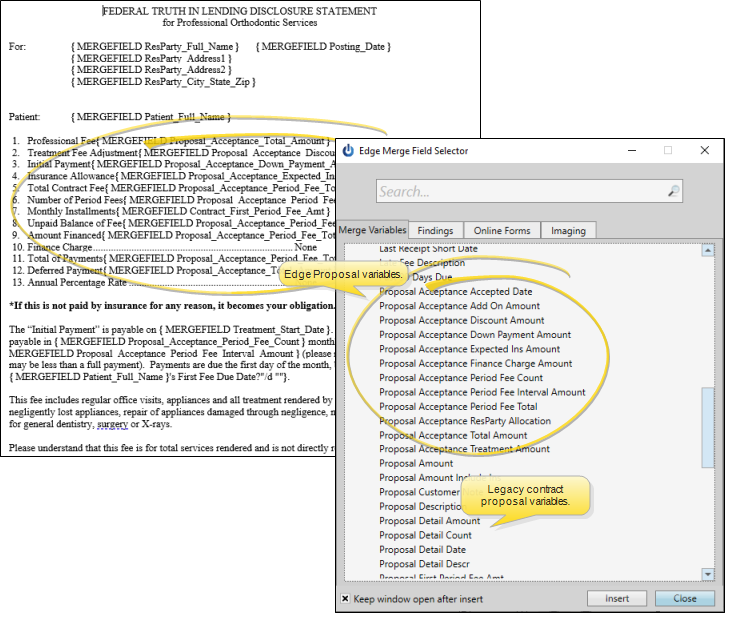
Edge Proposal Mail Merge Documents
You can use the “Proposal Acceptance” variables to include accepted Edge Proposal details in your mail merge documents. Documents that use these variables must be set to the Proposal Acceptance document selection type in your Mail Merge Documents editor for the data to merge correctly. (Be sure to use the “Proposal Acceptance” variables for merging with Edge Proposal data: The “Proposal” variables are for use with the legacy contract proposal system and not Edge Proposal.)
Canadian ACH Transaction Support
Edge Cloud users in Canada can now save ACH (electronic bank transfer) payments on file for their billing parties, as well as manually post ACH transactions and refunds for their patients. To use this feature, you must have a valid Global Payments Integrated payment account set up for Electronic Transfer in your Edge Cloud Payment Accounts editor. If you practice in both the United States and Canada, you will need to set up a payment account for each country. To differentiate the Canadian account, either the office assigned to the payment account must have a Canadian address, or the default country in your Practice editor must be Canada.
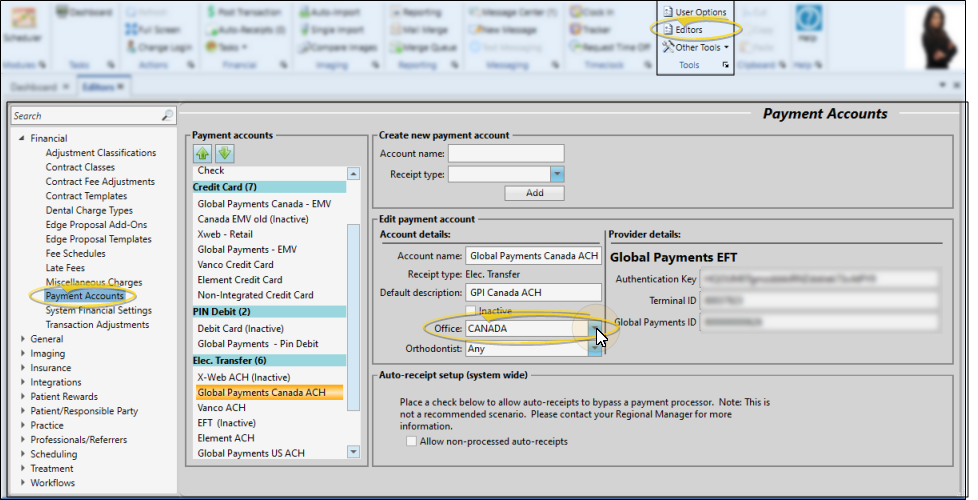
When you create a payment on file or post an ACH transaction you will be prompted for the Canadian banking fields, rather than the fields associated with banks in the United States.
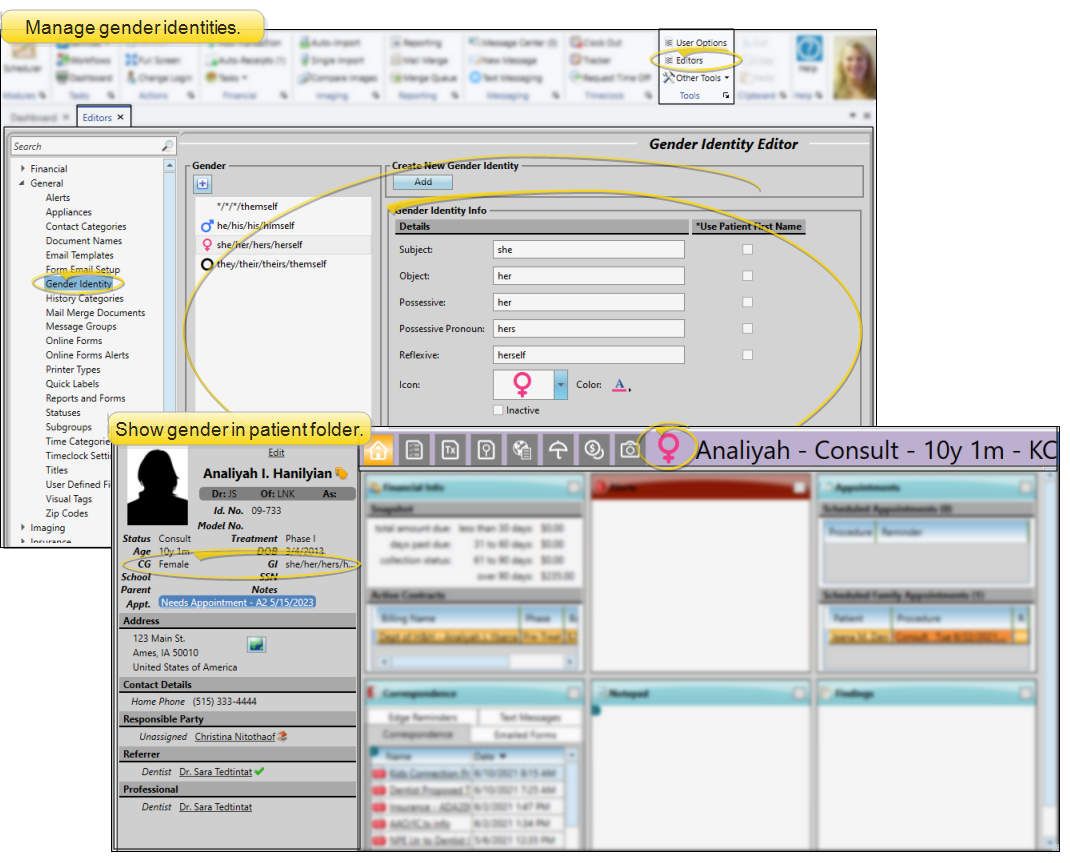
Gender Identity Support
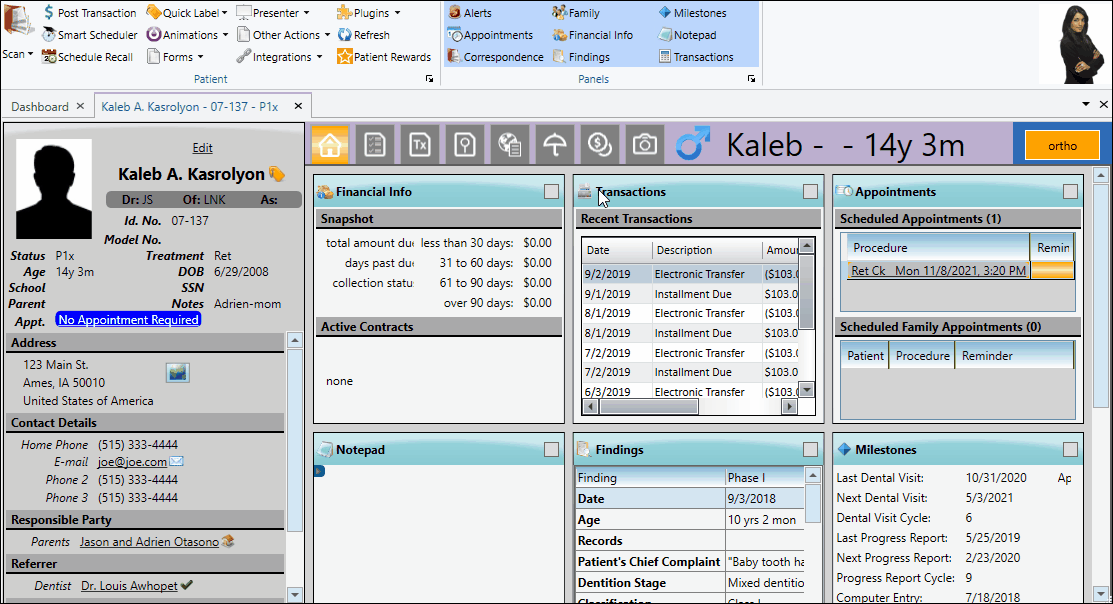
You can now identify both the patient’s clinical gender and gender preference, providing you with easy access to both the patient’s clinical presentation and preferred pronouns. The new Gender Identity editor in Edge Cloud includes standard identity pronouns and associated visual icons, but you can add to them and change them as needed for your practice.
As you create new patient folders, you will be able to select both the clinical gender and the preferred gender identity. The abbreviations “CG” (clinical gender) and “GI” (gender identity) appear on the Patient Information panel of the patient folder. You can optionally use your Visual User Options to show / hide the gender identity icon in the patient folder header. If gender information is incorrect, you can edit the patient information panel to update the fields.
In addition, there are now gender identity mail merge variables as well as the original patient gender variables to accommodate merging both clinical and gender identity preferences in your mail merge documents. And, you can use both the patient’s clinical gender and gender identity in your Edge Cloud subgroups.
- Patient-Facing Identity Only - The Edge Cloud preferred gender identity feature is provided to help you better understand and communicate with your patients. Areas of Edge Cloud that require the patient’s gender at birth, such as insurance details, will remain the clinical gender only.
Online Form Links Can Specify Doctor, Office and Other Metadata
You can use your Online Forms editor to create data-specific links that you can add to your website and send in patient emails. The links can be specific to an individual doctor, office, and/or ad-hoc metadata that you can use to track and filter the forms however you wish. When the patient clicks the link and submits the form, their information will be associated with the doctor, office and whatever metadata you included in the link details. So, if you use filters when you download and process your online forms, you will see only those associated with the doctors, offices and other data you want to work with. To create this type of link, open the Online Forms editor and click Create Link from under your list of online forms to open the Create Link window.
- Use Metadata When Launching Forms In-Office - You can also include ad hoc metadata when you launch an online form for a new or existing patient from the Online Forms service window. Click for details…

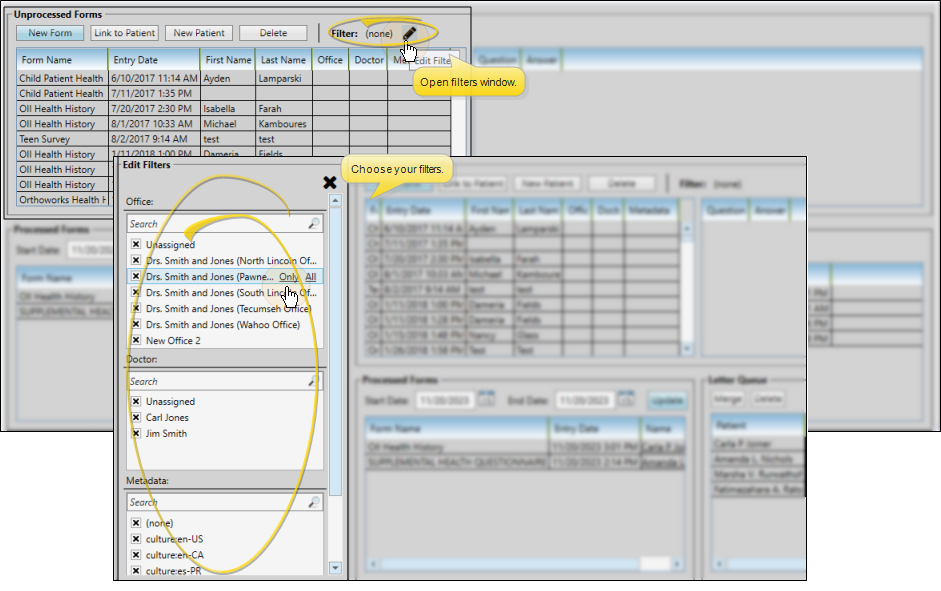
Online Forms Can be Filtered by Doctor, Office and Other Metadata
When you open the Online Forms service, you can use the Filter options to download and process only the forms relevant to you. When you exit and restart the service, Edge Cloud remembers your filter settings. In very large practices, this can help facilitate downloading and listing relevant forms more quickly. To open the filter options, click the Edit icon beside the Filter field. Then choose the doctors, offices, and metadata types you want to work with. Click “X” at the top of the filters window to save your choices and close the window. When filters are active, only online forms that fit your filters will be downloaded and included in your list of unprocessed forms.
Online Scheduling Form Required Cell Phone Option
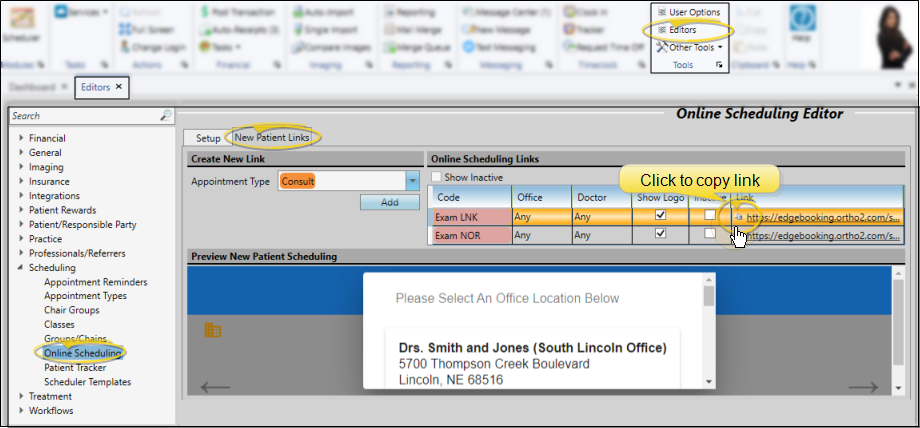
You can now require new patients to provide a cell phone number when they use Online Scheduling to book an appointment with your office. To do this, you simply add the code “&cellrequired=true” to the end of the scheduling link before you add the link to your web site or email it to prospective patients. The link would look something like this: https://edgebooking.ortho2.com/search?catalog=xxxxxxx&code=xxxx&cellrequired=true
You can find your scheduling links on the New Patient Links tab of your Edge Cloud Online Scheduling editor.
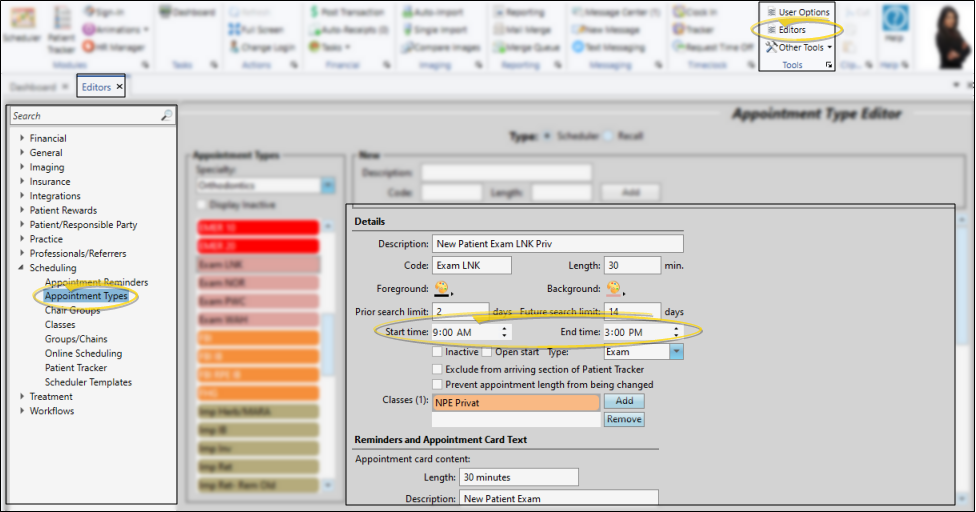
Online Scheduling Honors Procedure Start and End Times
When a new patient uses Online Scheduling to book an appointment with you, the procedure start and end times, if they exist in your Edge Cloud Appointment Types/Procedures editor, are taken into account when searching for available appointment openings.
Patient Sign In Confirmation Uses Nickname
When a patient uses Sign In at your office, the confirmation screen will now display their nickname, if there is one, along with their last name. Previously, the first name and last name were always used.

Security Added to System Integration Editor
Users must now have full security access to open the System Integrations editor, which controls how several third-party programs integrate with Edge Cloud. With this update, your security access to the System Integrations editor will match your current access to the Offices editor. To change the access level, an administrator will need to open the Security editor, and edit the System Integrations setting of the Practice Administration security group.

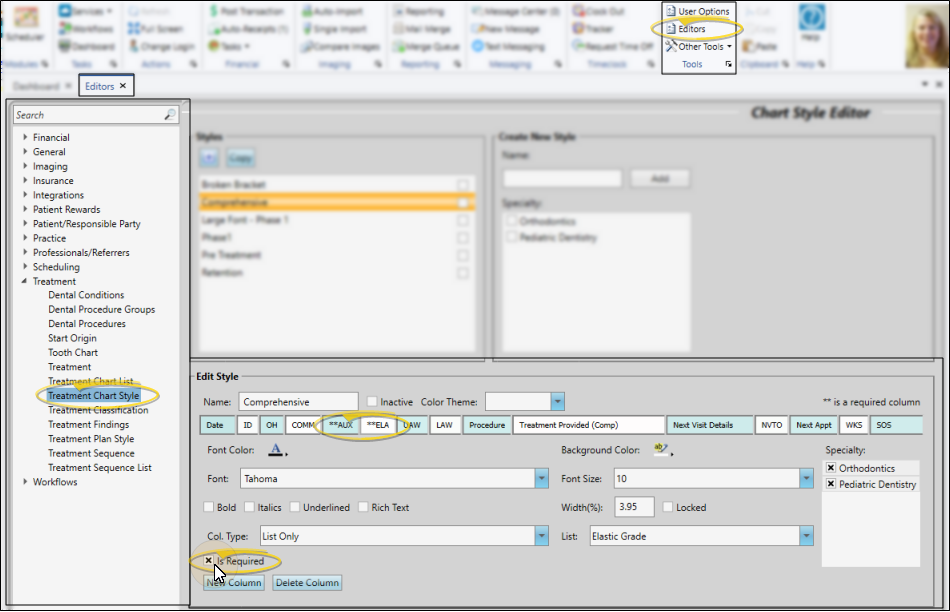
Treatment Chart Required Fields Option
You can now set up your Treatment Chart styles to require users to fill in certain fields before the chart can be saved in the patient folder. To flag a field as required, open the style in your Treatment Chart Styles editor, and select the column you want to require. Enable the “Is Required” option that appears toward the bottom of the window. Two asterisks will appear in the column heading to indicate that you have flagged this column as required. Be sure to save your changes. Then, when you use this style to enter a treatment chart record for a patient, the user must complete the required field before the record can be saved.
- Treatment Chart Only - This feature applies to treatment chart styles only: Treatment plan styles do not have this feature.
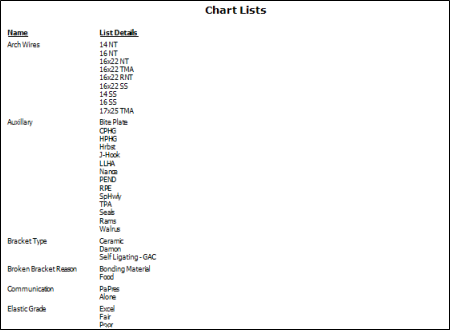
Treatment Chart / Plan List Report
Run the new Chart List report, available from the Tables section of your Reporting window, to view of all of the lists that you have created to use with your Treatment Chart and Treatment Plan styles, in alphabetical order. The report includes both the name of the list and all of the responses in that list.
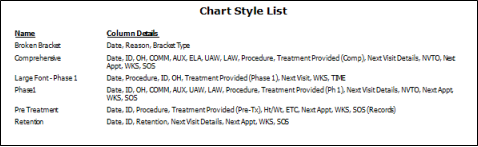
Treatment Chart Styles List
Run the new Chart Styles List report, available from the Tables section of your Reporting window, to view all of the Treatment Chart Styles you have created to input data into your patients' treatment charts. The report includes both the name of the style, and the column headings in that style. This report includes your Treatment Chart styles only: Treatment Plan styles are not included.